---
This tutorial guides the reader to use Microsoft Word Web App. However, the steps are also applicable to the Desktop version of Microsoft Word.
A) CREATING NEW DOCUMENT
1) If you are using Desktop version of Microsoft Word, e.g Microsoft Word 2010, you may skip this step.
Browse the url http://skydrive.live.comYou need to log in to your outlook.com or hotmail.com in order to access this page.
Click Create/Word document.

2) By default, the system will create a document titled Document1.docx.

3) You will see the standard window interface.
The top bar shows the Application Name and Document Name.
The Ribbon shows the Tabs and Command Buttons.
The Document window shows a blank document that looks like a piece of white paper.
At the bottom left of the window, there is the word counter and the language label.

4) Click somewhere on the document window (the white area) you you will get a blinking cursor.

B) COPY-PASTE TEXTS
5) Copy the following texts and paste them to your Word document.
5.1) Highlight the text below and [right-click]+[copy] or press [ctrl]+[c].
Introduction To Word Processing
History of Word Processing
Word processing is the creation of documents using a word processor. It can also refer to advanced shorthand techniques, sometimes used in specialized contexts with a specially modified typewriter. The term was coined at IBM's Böblingen, West Germany (at that time) Laboratory in the 1960s.
Word Processing Software
Word Processing Software Microsoft Word is the most widely used word processing software. Microsoft estimates that over 500,000,000 people use the Microsoft Office suite,[1] which includes Word. Many other word processing applications exist, including WordPerfect (which dominated the market from the mid-1980s to early-1990s on computers running Microsoft's MS-DOS operating system) and open source applications OpenOffice.org Writer, LibreOffice Writer, AbiWord, KWord, and LyX. Web-based word processors, such as Office Web Apps or Google Docs, are a relatively new category.
Typical Features of Word Processing Software
Clipboard functions: Copy, Cut and Paste texts.
Changing Font properties: Font name, Font size, Growing or Shrinking Font sizes etc.
Changing Paragraph properties: Bulleted list, Numbered list, indentation, Alingment, Line Spacing etc. Changing Text Styles: Normal Text, Title, Subtitle, Headings etc.
Spell Checking
5.2) Switch to your Word document (you can press [alt]+[tab] to switch between applications).
5.3) Go to Clipboard Section. Click Paste.

5.3.1) If you get a paste error message, use [ctrl]+[c] keys instead.

5.4) The content is pasted to the Word document.

C) SPELL CHECK
6) Notice that some texts have red error marker underlining them.
In the example below, Word doesn't recognize the text as an English word.

6.1) Locate the Spell Check button.
Click the button.

6.2) Word suggests a replacement to the marked text.
However, we are not going to change it as this is a correct German word.

6.3) Keep on clicking the Spelling button and Word will cycle through the red underlined texts till the last one. This time the text spelling is indeed wrong. Click the word Alignment in the context pop-up menu to make correction.

6.4) Word will replace the selected text with the suggestion that you have chosen.
D) LINE BREAK
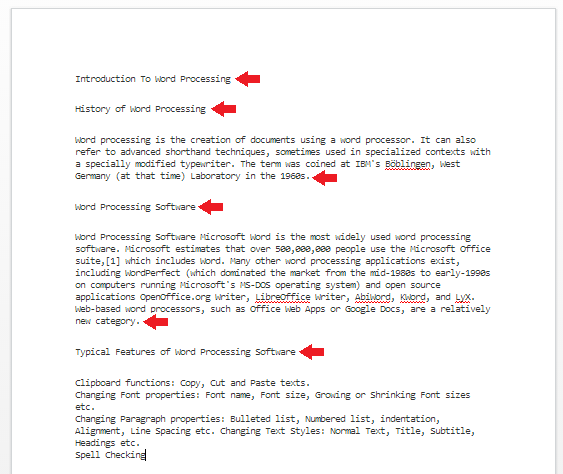
7) Line break helps to improve the passage readability.
7.1) Refer to the example below, press [Enter] key at the position marked by the red arrow.
E) FONT PROPERTIES
8) The Font section provides buttons for changing the Font properties.
8.1) Press [Ctrl]+[a] keys to select all text.
8.2) Go to Font Section. Select Arial from the drop down list.

8.3) The whole texts changed to Arial.

F) BOLD TEXTS
9) Bold texts distinguish the key points from other body texts.
9.1) Check that your paragraph is as follows. If the text are not in the right place, adjust their position accordingly.

9.2) Using your mouse, select the phrase "Clipboard functions".
9.3) As soon as you finish selecting the phrase, a context menu pops up. Set Bold property.

9.4) Repeat the same steps for other phrases as follows:

G) BULLETS
10) Bullets help to separate each items in an unordered list. This improves passage readability.
10.1) Using your mouse, select the whole text under the heading "Typical Features of Word Processing Software.
10.2) Alternatively, you can click your mouse beside the first letter of the first line.

10.2.1) Hold [Shift] key. Press [Down] key until you reach the last line. The whole texts are selected as below.

10.3) Go to Paragraph Section. Click the bullet drop-down list and choose Square bullet.

10.4) The result would be as follows.

H) INDENTATION
11) Indentation push texts away from left margin to show their hierarchy in the passage.
11.1) Select the paragraph under the heading "History of Word Processing".
11.2) Go to Paragraph Section. Click Increase Indent.

11.3) Repeat the step until the whole document looks like below.

I) STYLING
12) Document Styling helps to organize the structure of a document. This improves content navigation and easy conversion to other type of document such as Web Document.
12.1) Select the first line "".
12.2) Click the Drop Down list to get More Styles.

12.3) Click Title style.

12.4) Click the heading "History of Word Processing", "Word Processing Software" and "Typical Features of Word Processing Software". Apply Heading 1 style.
12.5) Finally, the document will look like below.

13) The final texts looks more professional than the original texts. The look of the document is important as it improves readability aspects as well as visually appealing to the reader..
---
No comments:
Post a Comment