SIMPLE INTRODUCTION TO Wordpress Blog Setup (Offline)
1) Download the pre-installed Wordpress package from the https://sites.google.com/site/notawordpress/home/beginner.
2) Unzip the file (preferably to your computer root, i.e C:\ ).
2.1) Put the zip file to C:\
2.2) Right-hand click, select Extract All.
2.3) Extract to C:\
3) Look for usbwebserver.exe program. Run the program to get Apache Server and MySQL Database server running.
You may be required to unblock Windows Firewall protection against Apache and MySQL.
4) Go to usbwebserver Control Panel.
Click localhost
5) Your Web Browser will automatically open a localhost URL. You should get usbwebserver page.
6) Browse http://localhost:8080/wordpress. You should get Wordpress blog page.
-----
This package uses the following database details:
database name: wordpress1
user: root
password: usbw
server: localhost
Tuesday, April 9, 2013
Wordpress.com Blog Account
SIMPLE INTRODUCTION TO CREATE WORDPRESS.COM BLOG ACCOUNT
---
1) Browse http://wordpress.com
Click Get Started.
2) Click Get Started.
Fill in the required details.
3) Scroll further down.
Click Create Blog.
4) Click My Blogs.
5) Click your blog name to go to the dashboard
6) Use the dashboard to manage various aspects of your blog site.
---
1) Browse http://wordpress.com
Click Get Started.
2) Click Get Started.
Fill in the required details.
3) Scroll further down.
Click Create Blog.
4) Click My Blogs.
5) Click your blog name to go to the dashboard
6) Use the dashboard to manage various aspects of your blog site.
Microsoft Web Apps and SkyDrive
SIMPLE INTRODUCTION TO Microsoft Web Apps and SkyDrive
---
---
Why Use Web Apps and SkyDrive?
Limitations of Web Apps and SkyDrive
Reduced features in Web Apps
---
---
Office Web Apps are free, basic versions of the most popular programs in the Microsoft Office suite. They let you create Word documents, Excel spreadsheets, and more without having to buy or install any software. There are four Web Apps:
- Word - for creating text documents
- Excel - for working with spreadsheets
- PowerPoint - for creating presentations
- OneNote - for taking and organizing notes
You don't need to install anything on your computer to use Web Apps. Instead, you work with them online, using a service called Microsoft SkyDrive.
SkyDrive is a free, online storage space that you can use as your own personal online hard drive. When you create a document with one of the Web Apps, it will be saved to your SkyDrive. You can store other files there, too. Some people refer to this type of online storage as the cloud. Since Web Apps and SkyDrive are based in the cloud, you can access them from any device with an internet connection, at any time.
Once you’ve used Web Apps and SkyDrive to store files in the cloud, you can edit and share them without ever having to download them to your computer. You can also upload files from your computer, including photos and music. You can even sync your computer and SkyDrive so that any changes you make to your files are automatically copied between the cloud and your computer. As you can see below, working with the cloud makes all of these things possible.
To use Web Apps and SkyDrive, you'll need a Microsoft account (previously called a Windows Live Account). Getting a Microsoft account will also give you access to features like email and instant messaging.
---
Why Use Web Apps and SkyDrive?
Limitations of Web Apps and SkyDrive
Reduced features in Web Apps
SkyDrive is one of the best cloud storage services available today, offering seven gigabytes (7 GB) of freestorage space. And because SkyDrive allows you to share and edit documents with Web Apps, collaborating with others is easier than ever before.
Of course, Web Apps and SkyDrive aren't the only services that let you create and store files in the cloud—for example, Google Drive and Apple's iCloud provide comparable features. However, Web Apps offer one majoradvantage over these other services: Web Apps are very similar to the desktop versions of the Microsoft Office applications. If you already know how to use those applications, it will be very easy for you to start using Web Apps. Also, Web Apps and the regular Office applications use the same file types. This means that you can edit the same file in both Web Apps and the desktop version.
While Web Apps and SkyDrive are useful tools, they're not perfect. Web Apps are limited versions of Microsoft Office, therefore they may be missing some of the features you like to use. You can still create documents, spreadsheets, and presentations, but they may not look as polished without certain tools.
Still, if you can't afford to purchase the full version of Microsoft Office, Web Apps are a great (and free) alternative. Keep in mind that you need to have access to the internet to use Web Apps and SkyDrive. If your internet connection is unreliable, you may want to keep copies of important files on your computer, as well.
---
Outlook.com Email Account
SIMPLE INTRODUCTION TO CREATE OUTLOOK.COM EMAIL ACCOUNT
---
1) Browse the URL www.outlook.com
2) Notice the Sign Up Now link at the bottom right of the window.
Click Sign Up Now.
3) Fill up the form.
Check that the username that you are applying for has not been used yet. Otherwise, you have to re-enter a new one.
4) Once approved, you can log in to the account.
---
---
1) Browse the URL www.outlook.com
2) Notice the Sign Up Now link at the bottom right of the window.
Click Sign Up Now.
3) Fill up the form.
Check that the username that you are applying for has not been used yet. Otherwise, you have to re-enter a new one.
4) Once approved, you can log in to the account.
---
Gmail.com Email Account
SIMPLE INTRODUCTION TO CREATE GMAIL.COM EMAIL ACCOUNT
1. Go to http://mail.google.com .
2.Look at top right corner. Notice the red button with the label "CREATE AN ACCOUNT". Click the button.
3. Fill-in the form
4. Click Next Step.
1. Go to http://mail.google.com .
2.Look at top right corner. Notice the red button with the label "CREATE AN ACCOUNT". Click the button.
3. Fill-in the form
4. Click Next Step.
Facebook Account
SIMPLE INTRODUCTION TO CREATE FACEBOOK.COM ACCOUNT
---
To Create a Facebook Account:
---
---
To Create a Facebook Account:
- Using your browser, navigate to www.facebook.com.
- Under the words Sign Up, enter your personal information and desired password.
- After you've entered your information, click Sign Up. You may also need to complete a security challenge(also known as a CAPTCHA code) before you can proceed.
- Now, you'll have the chance to find your first Facebook Friends. To find Friends, enter your email address and click Find Friends. You can also skip this step and add Friends later if you don't want to give Facebook access to your email account.
- If you want, you can now add information about your high school, college, and employer. Click Save & Continue when finished, or click Skip if you prefer to keep this information private.
- If you entered education and employment information, Facebook will suggest Friends for you. Click anyone you want to add as a Friend, then click Save & Continue or click Skip.
- Add a picture of yourself to your Profile. Click Upload a Photo to select a file from your computer, or Take a Photo to take a new photo with your webcam. If you're not ready to add a profile photo, click Skip.
- Once you're satisfied with your Profile picture, click Save & Continue.
- The Welcome to Facebook page will appear.
- Sign in to your email account.
- Open the confirmation message from Facebook: "Welcome to Facebook - get started now!"
- Click Get Started to confirm your account.
- Your Facebook Home page will open. You now have full access to Facebook, and all future notifications will be sent to the email address you provided.
At this point, Facebook will send a confirmation email to the email address that you provided. Before you can access all of Facebook's features, you'll need to confirm your email address.
---
Monday, April 8, 2013
Microsoft Word Web App
---
This tutorial guides the reader to use Microsoft Word Web App. However, the steps are also applicable to the Desktop version of Microsoft Word.
A) CREATING NEW DOCUMENT
1) If you are using Desktop version of Microsoft Word, e.g Microsoft Word 2010, you may skip this step.
Browse the url http://skydrive.live.comYou need to log in to your outlook.com or hotmail.com in order to access this page.
Click Create/Word document.
2) By default, the system will create a document titled Document1.docx.
3) You will see the standard window interface.
The top bar shows the Application Name and Document Name.
The Ribbon shows the Tabs and Command Buttons.
The Document window shows a blank document that looks like a piece of white paper.
At the bottom left of the window, there is the word counter and the language label.
4) Click somewhere on the document window (the white area) you you will get a blinking cursor.
B) COPY-PASTE TEXTS
5) Copy the following texts and paste them to your Word document.
5.1) Highlight the text below and [right-click]+[copy] or press [ctrl]+[c].
Introduction To Word Processing
History of Word Processing
Word processing is the creation of documents using a word processor. It can also refer to advanced shorthand techniques, sometimes used in specialized contexts with a specially modified typewriter. The term was coined at IBM's Böblingen, West Germany (at that time) Laboratory in the 1960s.
Word Processing Software
Word Processing Software Microsoft Word is the most widely used word processing software. Microsoft estimates that over 500,000,000 people use the Microsoft Office suite,[1] which includes Word. Many other word processing applications exist, including WordPerfect (which dominated the market from the mid-1980s to early-1990s on computers running Microsoft's MS-DOS operating system) and open source applications OpenOffice.org Writer, LibreOffice Writer, AbiWord, KWord, and LyX. Web-based word processors, such as Office Web Apps or Google Docs, are a relatively new category.
Typical Features of Word Processing Software
Clipboard functions: Copy, Cut and Paste texts.
Changing Font properties: Font name, Font size, Growing or Shrinking Font sizes etc.
Changing Paragraph properties: Bulleted list, Numbered list, indentation, Alingment, Line Spacing etc. Changing Text Styles: Normal Text, Title, Subtitle, Headings etc.
Spell Checking
5.2) Switch to your Word document (you can press [alt]+[tab] to switch between applications).
5.3) Go to Clipboard Section. Click Paste.
5.3.1) If you get a paste error message, use [ctrl]+[c] keys instead.
5.4) The content is pasted to the Word document.
C) SPELL CHECK
6) Notice that some texts have red error marker underlining them.
In the example below, Word doesn't recognize the text as an English word.
6.1) Locate the Spell Check button.
Click the button.
6.2) Word suggests a replacement to the marked text.
However, we are not going to change it as this is a correct German word.
6.3) Keep on clicking the Spelling button and Word will cycle through the red underlined texts till the last one. This time the text spelling is indeed wrong. Click the word Alignment in the context pop-up menu to make correction.
6.4) Word will replace the selected text with the suggestion that you have chosen.
D) LINE BREAK
7) Line break helps to improve the passage readability.
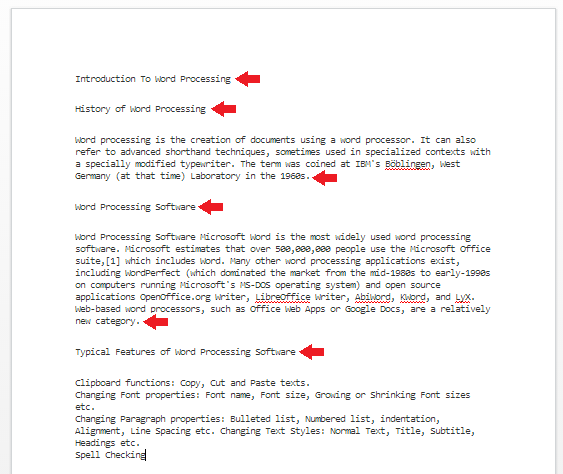
7.1) Refer to the example below, press [Enter] key at the position marked by the red arrow.
E) FONT PROPERTIES
8) The Font section provides buttons for changing the Font properties.
8.1) Press [Ctrl]+[a] keys to select all text.
8.2) Go to Font Section. Select Arial from the drop down list.
8.3) The whole texts changed to Arial.
F) BOLD TEXTS
9) Bold texts distinguish the key points from other body texts.
9.1) Check that your paragraph is as follows. If the text are not in the right place, adjust their position accordingly.
9.2) Using your mouse, select the phrase "Clipboard functions".
9.3) As soon as you finish selecting the phrase, a context menu pops up. Set Bold property.
9.4) Repeat the same steps for other phrases as follows:
G) BULLETS
10) Bullets help to separate each items in an unordered list. This improves passage readability.
10.1) Using your mouse, select the whole text under the heading "Typical Features of Word Processing Software.
10.2) Alternatively, you can click your mouse beside the first letter of the first line.
10.2.1) Hold [Shift] key. Press [Down] key until you reach the last line. The whole texts are selected as below.
10.3) Go to Paragraph Section. Click the bullet drop-down list and choose Square bullet.
10.4) The result would be as follows.
H) INDENTATION
11) Indentation push texts away from left margin to show their hierarchy in the passage.
11.1) Select the paragraph under the heading "History of Word Processing".
11.2) Go to Paragraph Section. Click Increase Indent.
11.3) Repeat the step until the whole document looks like below.
I) STYLING
12) Document Styling helps to organize the structure of a document. This improves content navigation and easy conversion to other type of document such as Web Document.
12.1) Select the first line "".
12.2) Click the Drop Down list to get More Styles.
12.3) Click Title style.
12.4) Click the heading "History of Word Processing", "Word Processing Software" and "Typical Features of Word Processing Software". Apply Heading 1 style.
12.5) Finally, the document will look like below.
13) The final texts looks more professional than the original texts. The look of the document is important as it improves readability aspects as well as visually appealing to the reader..
---
Subscribe to:
Posts (Atom)